Quickstart: Your Web3 Subscriptions Checkout Widget by Superfluid
Welcome to the quick start guide for the Superfluid Subscription Widget. Follow the steps below to seamlessly integrate our widget into your website and gate content based on active web3 streams.
Table of Contents
- Prerequisites
- Step 1: Building Your Widget
- Step 2: Integrating Widget into Your Website
- Step 3: Verifying Active Streams
Prerequisites
Before you begin with the Superfluid Web3 Subscription Widget, ensure you meet the following prerequisites:
Knowledge
- JavaScript/TypeScript (JS/TS): A foundational understanding of JavaScript/TypeScript is necessary for successful integration and troubleshooting.
- Blockchain Development: Familiarity with the basics of blockchain development will be beneficial, given the widget's blockchain nature.
- Familiarity with Super Tokens and Streams: Some familiarity with Super Tokens (opens in a new tab) and Streams (opens in a new tab) is desired but not necessary.
Setup
-
Initialize a Node/React/Next Project: If you haven't already, create a new Node/React/Next project using one of the commands below:
$ npx init -
Install Superfluid SDK: The Superfluid SDK is a pivotal component for this integration. You can install it using one of the following package managers:
$ npm install @superfluid-finance/sdk-core
Ensure you have both Node.js and a package manager (npm or Yarn) installed on your system before proceeding.
With these prerequisites in place, you're set to proceed with building and integrating your widget.
Step 1: Building Your Widget
To integrate the Superfluid checkout widget into your platform, follow these concise steps. This will ensure your users can make real-time payments seamlessly.
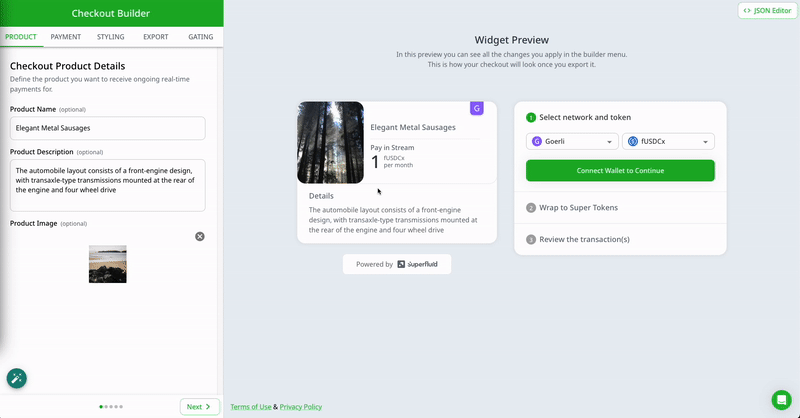
- Access the Checkout Builder dashboard (opens in a new tab).
- In the 'Product' tab: Input Product Name, Description, and upload an Image logo for your product.
- In the 'Payment' tab: Add Payment Options, select Network, Token, set Stream Rate, and define the Receiver address.
- View the live 'Widget Preview' on the right to see user interaction flow.
- Navigate to the 'Export' tab, retrieve the code, and integrate into your platform.
For advanced styling options, explore the 'Styling' tab in the Checkout Builder.
By following these steps, you will have a functioning Superfluid checkout widget ready to facilitate real-time payments on your platform. Happy streamlining!
Step 2: Integrating Widget into Your App
Superfluid provides an easy-to-use widget that can be swiftly integrated into your website or application. Let's explore the two primary methods for this integration.
Option 1 (Easy): Embedding the Widget Using a Link
This is the quickest way to get started. You can redirect users to the widget via a simple link. Add this to your application's codebase and you are good to go:
//Example for a React app

import React from "react";

function MyApp() {
  return (
    <div>
      {/* Other components */}
      <a href="https://superfluid.link/path_to_widget">Subscribe</a>
    </div>
  );
}Using the link method ensures you can get started with Superfluid without diving deep into your app's structure. It's fast, efficient, and user-friendly.
Option 2 (Complex): In-App Integration using NPM Package
If you want a more integrated experience where the Superfluid widget resides within your application's ecosystem rather than redirecting users externally, Superfluid offers a dedicated npm package for this purpose.
-
Installation: Install the npm package to your project.
npm install @superfluid-finance/widget -
Integrate in Your App: Now, you can import the widget into your application. We won't dive deep into the details here, but you can refer to the detailed Superfluid Widget Integration Guide.
Step 3: Verifying Active Streams
To ensure that users have an active stream and are contributing the necessary amount to access your blog content, you can leverage our SDK. This function will provide you with the flow rate of a specific user. Based on this rate, you can then decide to grant or deny access to your content.
- Get The Flow Rate: Here is an example of a function
getFlowInfoallowing you to get the current flow rate of the user to your receiver address.
// This code defines a function that retrieves the flow rate of a user's stream to a specific receiver address using Superfluid's SDK.

// Define the user's Ethereum address
const userAddress = "USER_ADDRESS_HERE";

// Define the receiver's Ethereum address
const receiverAddress = "RECEIVER_ADDRESS_HERE";

// Define your provider (wagmi, Ethers, web3Js, etc.)
const myProvider = {DEFINE_YOUR_PROVIDER_HERE};

// Define an asynchronous function that retrieves the flow rate of a user's stream to a specific receiver address
async function getFlowRate(userAddress) {
  // Create a new Superfluid Framework instance
  const sf = await Framework.create({
    chainId: INSERT_CHAIN_ID_HERE, // Replace with the chain ID of your EVM network
    provider: myProvider,
  });

  // Load the Super Token associated with the stream
  const token = await sf.loadSuperToken(
    "SUPER_TOKEN_ADDRESS_HERE" // Replace with the address of the Super Token associated with the stream
  );

  // Retrieve the flow information for the user's stream to the receiver address
  const flowInfo = token.getFlow({
    sender: userAddress,
    receiver: receiverAddress,
    providerOrSigner: myProvider,
  });

  // Return the flow rate of the user's stream to the receiver address
  return flowInfo.flowRate;
}
Use EVM libraries (eg. wagmi (opens in a new tab) or ethers (opens in a new tab)) to create the provider and retrieve the user's address. You can also use the Superfluid console (opens in a new tab) to retrieve the Super Token address.
- Check the Flow Rate: Compare the user's flow rate against the required rate to access the content.
const requiredFlowRate = 1000; // Example value

if (userFlowRate >= requiredFlowRate) {
  // Grant access to the blog content
} else {
  // Deny access or prompt the user to increase their flow rate
}Always ensure that you're verifying streams in a secure manner to prevent unauthorized
access to premium content. wagmi and Superfluid provide the tools, but always
employ best practices in your implementation.
We hope this guide helps you set up your SuperFluid Subscription Widget effortlessly. For any feedback or questions, don't hesitate to contact us.